


Friday, September 3, 2010
Cartoon
Just a funny cartoon from Architexts before we leave for the extended weekend. They print a lot of cartoons from the architect's perspective.


Thursday, July 22, 2010
WebEx Online Meetings

Tuesday, May 25, 2010
Pavestone Hatch Patterns
The Pavestone hatch patterns are now included in the list of AutoCAD hatch patterns. They are custom hatch patterns so you will have to go to the custom tab to select the Pavestone pattern you need. Use the scale of 1" for architectural units or .08333 for decimal engineering units.
Click here to view Pavestone's list of hatch pattern names.
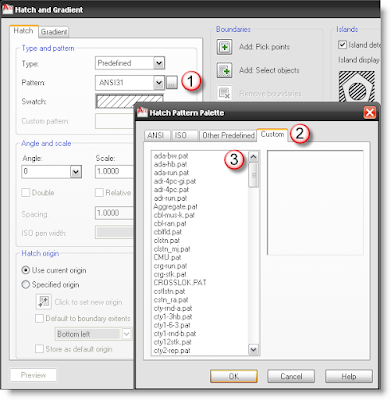
1. Click the Browse button.
2. Click the "Custom" tab.
3. Select the pattern you need, then click OK.
Click here to view Pavestone's list of hatch pattern names.
1. Click the Browse button.
2. Click the "Custom" tab.
3. Select the pattern you need, then click OK.
Monday, March 22, 2010
Single Project - Landscape Folder Structure
LANDSCAPE PROJECT TYPES
TBG has two types of Landscape project folder structures.
1.) Single Project Directory - This folder is normally a self contained project, meaning that all drawings in the directory tree will be used for this project only. It will have only one project number.
2.) Multiple Project Directory - This type of project contains many single projects under it, or in other words multiple project numbers. This is useful when there are files that will be used over and over again for each of the single projects in it. There will be many project numbers in contrast with the single project folder which has one project number.
Since a Multiple Project needs many single projects, we will cover this first.
HOW DO I MAKE THE SINGLE PROJECT DIRECTORY STRUCTURE?
To make a new Single Project folder, open AutoCAD and run the "SPJ" command. (refer to Command "SPJ")
THE SINGLE PROJECT DIRECTORY STRUCTURE
TBG has two types of Landscape project folder structures.
1.) Single Project Directory - This folder is normally a self contained project, meaning that all drawings in the directory tree will be used for this project only. It will have only one project number.
2.) Multiple Project Directory - This type of project contains many single projects under it, or in other words multiple project numbers. This is useful when there are files that will be used over and over again for each of the single projects in it. There will be many project numbers in contrast with the single project folder which has one project number.
Since a Multiple Project needs many single projects, we will cover this first.
HOW DO I MAKE THE SINGLE PROJECT DIRECTORY STRUCTURE?
To make a new Single Project folder, open AutoCAD and run the "SPJ" command. (refer to Command "SPJ")
THE SINGLE PROJECT DIRECTORY STRUCTURE
| The single project directory looks like the image to the right. These are what will be referred to as the core folders. The "Name" - In this case "Section 01" is the name of the project. It's not a very nice name for a project, but this example comes from a multiple project folder that we will be discussing later on. "Section 01 is the name of one of the sub-projects. "Section 01" could be named "Recreation Center", "Pocket Park", "Texas Tech Student Center", etc.. The name should follow the General File and Folder Naming standards. MULTIPLE PROJECT NOTE: If this is a single project in a Multiple Project folder, do not be redundant with the names. If the name of the project is Lake Creek Community, do not make the single project name "Lake Creek Community Section 01" or Lake Creek Community Recreation Center. Instead the single projects should be listed in the multiple project folder of "Lake Creek". The "Lake Creek" is assumed and the single project names should be "Section 01" or "Recreation Center". The "Job Number" - In this case is "A10100". The "A" in the job number stands for the city ("A" for Austin, "D" for Dallas, "H" for Houston, and "S" for San Antonio) and the first two numbers are the year of the project (in this case 2010). |  The Single Project Directory Structure |
00 Administration - This folder is for the administration and management documents of the single project. It should contain items such as:
|  The 00 Administration Folder |
| 00 Overall Xrefs - is to be used to house the xrefs for the SD (Schematic Design), DD (Design Development), and CD (Construction Documents), if they are being used simultaneously. Normally each xref is placed in it's corresponding xref folder, but using the 00 Overall Xrefs allows a person to make Permits, Design Development, and Construction drawings at the same time. This folder also contains an Archive folder and "xxName" folder for attached xrefs. (see Attached Xref Folder Structure) |  The 00 Overall Xrefs Folder |
| 01 Consultant Bases - Contains a list of folders with the consultants we work with. You have the option to leave the Architect and Civil the same, or renaming them to the name of the company you are working with. The folders underneath have the "YYYY-MM-DD - Name" to be renamed to the date that you receive the files and the name that helps you remember what was updated (e.g. weekly, parking change, drainage). This is the vault to refer to if a base gets edited incorrectly, damaged, or accidentally deleted. ABSOLUTELY no files are to be referenced from this location. Also, there is no reason to keep duplicates in the 00 Correspondence folder. Adding files in both places takes up extra space. Another use of the 01 Consultant Bases can be used for research. Treat the products you are looking for as consultant bases and give them folders for the product name. For instance, you are looking at different types of lights by different companies, you would create a folder for each company and place the documents and/or drawings in each folder. These you can reference later when making schedules for your projects in the CD phase or your image boards for your presentations. |  01 Consultant Bases |
02 Permit - This phase of the project contains files and folders needed for the permit process of the project.
|  The 02 Permits Folder |
03a SD (Schematic Design)) - Contains the documents and images needed for the Schematic Design phase of the project. This phase of the project includes sketches and illustrations for presentation and marketing purposes.
|  03a SD (Schematic Design) Folder |
03b DD (Design Development) - The 03b DD folder contains all the initial CAD drawings, CAD/Illustration presentations, and folders specifically for more graphic presentations. A 100% DD set of drawings, should be moved to the CD directory for a 50% CD set. Some people just bypass this DD folder set all together if it all happens quickly and work solely in the 04 CD directory. (folder structure shown below.)
|  03b DD (Design Development) Folder |
04 CD (Construction Documents) - Contains all the CAD drawings specifically for construction and is a little more detailed than the previous folders and will require a little more explanation. (folder structure shown below.)
|  04 CD (Construction Documents) Folder |
| 05 Issue Set - Contains PDF versions of Design Development (DD), or Construction Documents (CD) that have been sent out. These are meant to be our digital flat file containing documents that have been sent to the client, for review, for bid, the city, the county, etc. Presentations in the SD design can say in the deliverables folder. The correspondence folder should not replace the issue set. If it goes out it should be placed in the folder in the Issue Set with a date attached. These are complete sets of drawings. All revisions after the bid process should be kept in the Construction folder under the appropriate revisions. |  05 Issue Set Folder |
| 06 Construction - Contains the revisions made to the Construction Documents. After the bidding process and the bid has been awarded, 04 CD becomes the working document. This is the most important concept to understand. The working drawings will stay in the 04 CD, but all the PDF's and documents such as, Request for Information (RFI), Change Orders (CO), Change Proposal Requests (CPR),etc.. will be placed in the their appropriate construction folder. Common changes are included in the folder template shown below. Ideally each Construction item will have all documents placed in PDF format, such as, the Word documents and CAD drawings will all be combined into one document. |  06 Construction Folder |
| 07 Photos contains the site photos taken for the project. These are not photos referenced into drawings. All photos are placed in a folder with the YYYY-MM-DD - Name format. 08 LEED folder contains all the documents and forms needed for LEED Accreditation. Because this is such a new division in the project folder, there are no sub-folders for items yet. |  07 Photos and 08 LEED Folder |
09 EG folder is a folder created for Environmental Graphics. We currently offer environmental graphic design services for our projects. This folder looks and works like the SD folder above for presentations and graphics. Sometimes these will have a different job number than the rest of the project and you will see that tacked on the end of the folder name (e.g. 09 EG (A10100)).
|  09 EG (Environmental Graphics Folder |
Friday, March 19, 2010
General File And Folder Name Practices
The following office file and folder naming standards have been developed over the years working with different programs. We have come to find out, through experience, that file names are handled differently by different types of programs and services. Because there are different server types, operating systems, ftp protocols, browsers, databases, and programs that handle file names differently, we have developed a set of office standards that have encompassed our computing needs.
TBG OFFICE FILE AND FOLDER NAMING STANDARDS
There are reasons for all of these and granted you might not care too much about them, but these are some (not all) of the reasons why we have file naming standards the way we do.
TBG OFFICE FILE AND FOLDER NAMING STANDARDS
- File and Folder names should be as small as possible (length and size)
- File and folder names should be as meaningful as possible (e.g., instead of dsc00035.jpg, 2010-03-10_sitevisit.jpg)
- File and folder names when using the date should be in a "yyyy-mm-dd" format (e.g., instead of 03102010, 2010-03-10)
- File and folder names can only contain the symbols "(", ")", "-", and "_" when symbols are needed.
- File and folder names should not contain any of these characters ! @ # $ % ^ & * = + ~ ` [ ] . , { } | \ " ; : < > ?
- In case you missed it above NO PERIODS period!
- Folders should not be created when a simple file name will do
- File and folder names can and will be renamed, if they have periods and/or any of the symbols listed above in them.
There are reasons for all of these and granted you might not care too much about them, but these are some (not all) of the reasons why we have file naming standards the way we do.
- Windows won't even allow some of these characters to be used.
- Different databases handle symbols differently (e.g., Sepialine, Tape Backups, Exchange, IIS).
- Access via dos commands can be tricky.
- When searching for files "*" means any character, "#" means any number "@" means any alpha character "%" means space.
- Microsoft's MSDN article on naming conventions say that a period should be used to separate the base file name from the extension. Program conflicts can arise when using periods, because different programs have differing rules when it comes to handling path names and file names.
- Microsoft's MSDN article on file naming issues with Share Portal and Share Point Sever has problems with file names that have periods. There are some specific ways around this, but we would rather be safe then sorry.
- The more folder names that exist in a file, the longer it take a programs to open.
- Autodesk products have had previous problems with file and folder names that have brackets, symbols, and long names (previous versions had 32 character limit). They may accept these now, but keeping things short is still a good practice.
Tuesday, March 16, 2010
Posting To Basecamp Via E-mail
HOW TO SET UP A BASECAMP CONTACT TO POST VIA E-MAIL
Most people log into Basecamp and then post their files and messages. If you post a lot of files and messages to your Basecamp project, here is a quick way to post your files and messages without ever having to log into the Basecamp site. It will require a one time setup between Basecamp and Outlook for each Basecamp project.
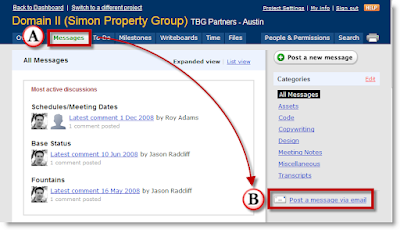
A.) Log into Basecamp, go to your project, and click on the "Messages" tab.
B.) Click on "Post a message via e-mail"
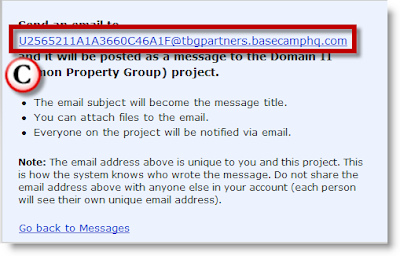
C.) This will bring up a screen with a long e-mail address. This is the Basecamp project e-mail address that you will need. Highlight and copy this e-mail address.
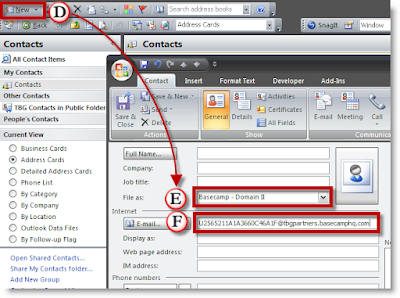
D.) Click on the "New Contact" button in Outlook.
(Optional -You can copy and paste that e-mail address into a new e-mail message. Although it may become hard to remember whose address is associated with the project after doing this a few times)
E.) Use a common contact name you can remember. I would suggest using a common name for all Basecamp users, such as, "Basecamp - Domain II", or "Basecamp - Congress Ave".
F.) Paste that e-mail address into the e-mail field and save the contact.
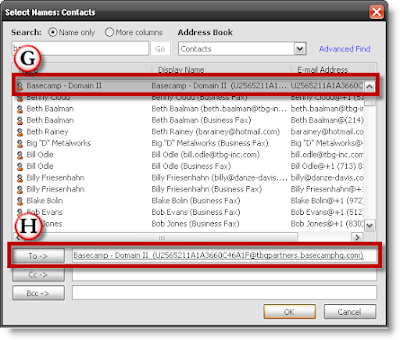
G.) Start a new e-mail in Outlook Click on the "To" button to bring up the contacts list. Find your "Basecamp" contact in your Outlook address book.
H.) Once selected, click the button "To", thus inserting the Basecamp email address.Type your message and send it. Next time you log into Basecamp you will find your items there and your project group will be notified of any new posts.
When posting messages via e-mail, the message will be posted in the "Messages" tab and any files attached will be placed int the "Files" tab.
Most people log into Basecamp and then post their files and messages. If you post a lot of files and messages to your Basecamp project, here is a quick way to post your files and messages without ever having to log into the Basecamp site. It will require a one time setup between Basecamp and Outlook for each Basecamp project.
A.) Log into Basecamp, go to your project, and click on the "Messages" tab.
B.) Click on "Post a message via e-mail"
C.) This will bring up a screen with a long e-mail address. This is the Basecamp project e-mail address that you will need. Highlight and copy this e-mail address.
D.) Click on the "New Contact" button in Outlook.
(Optional -You can copy and paste that e-mail address into a new e-mail message. Although it may become hard to remember whose address is associated with the project after doing this a few times)
E.) Use a common contact name you can remember. I would suggest using a common name for all Basecamp users, such as, "Basecamp - Domain II", or "Basecamp - Congress Ave".
F.) Paste that e-mail address into the e-mail field and save the contact.
G.) Start a new e-mail in Outlook Click on the "To" button to bring up the contacts list. Find your "Basecamp" contact in your Outlook address book.
H.) Once selected, click the button "To", thus inserting the Basecamp email address.Type your message and send it. Next time you log into Basecamp you will find your items there and your project group will be notified of any new posts.
When posting messages via e-mail, the message will be posted in the "Messages" tab and any files attached will be placed int the "Files" tab.
Friday, March 5, 2010
Single Project - Presentations Folder
PRESENTATIONS FOLDER
The presentations folder can be found in the 03a SD, 03b DD, and 09 EG (Environmental Graphics) if those services are needed.
RENAMING THE PRESENTATIONS FOLDER
Each presentation has a date that needs to be changed when you start working on the presentation. It can either be the date you started working on it or the date of the presentation (if you know it) - and the "Name" of the presentation (ie. City Council, Image Boards).
HOW TO USE THE PRESENTATIONS SUB-FOLDERS
A description of the sub-folders needed to make the presentations are shown below:
The presentations folder can be found in the 03a SD, 03b DD, and 09 EG (Environmental Graphics) if those services are needed.
 |  |  |
| 03a SD Folder | 03b DD Folder | 09 EG Folder (if Needed) |
RENAMING THE PRESENTATIONS FOLDER
Each presentation has a date that needs to be changed when you start working on the presentation. It can either be the date you started working on it or the date of the presentation (if you know it) - and the "Name" of the presentation (ie. City Council, Image Boards).
 |
| Example of changing the presentation dates |
HOW TO USE THE PRESENTATIONS SUB-FOLDERS
A description of the sub-folders needed to make the presentations are shown below:
- "01- 3D-Work" contains any modeling items used for the presentation can also contain AutoCAD base drawings and/or any other type of Base informaiton
- "02 Raw-Images" contains the collection of unedited images. It is almost a temp file for images. For instance scanned images, scanned bases, or images found on the internet. They are kept here just to have a copy of the original in case the editing process does not go as planned. * Note: if the image does not need editing or you are going to use it as is, you can place the images in the 03 Working-Images folder or directly in the links folder if you are going to use it as is.
- "03 Working-Images" - Are the images that are being edited, layered, and/or modified for the presentation. When you have the image you want, copy it to the "Links" folder. If you are using InDesign, the links folder will contain all the links for the image board or presentation you are making. InDesign will automatically manage the images if they are in the folder directly below it or in the same folder as the document.
- "04 Layouts" - contains all the sheet layouts from Freehand, InDesign, or other layout program. These layouts are placed directly in the 04 Layouts folder.
- "04 Layouts - Links" - Contains all the links, files used, or files inserted for creating the layouts.
- "05 Deliverables" - this folder contains the deliverable files that are made for the presentation that will be sent out. Sometimes this means the full size PDF documents, or handouts, marketing materials, or other type of files delivered to the client.
Subscribe to:
Posts (Atom)